The Importance of Proper Dock Repair

Docks withstand a lot of wear and tear, and it is important to keep up with routine maintenance and repairs. Watch out for rotting, rust, cracks, creosote, and wobbling or creaking sounds that can indicate a serious structural problem.

Dock Repair

Keeping up with these little issues will extend the life of your dock, saving you money in repair and replacement costs over time. Click Here to learn more.

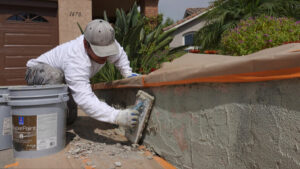
Warped deck boards are a common issue and can occur due to several reasons. Depending on the severity of the problem, it may be necessary to seek professional assistance for a comprehensive solution. Often, it is not just one board that has become warped but rather the entire deck. This may indicate that the underlying structure has become unstable due to frost heave, soil erosion, or excessively wet conditions.

Wood is a natural material that naturally adjusts to changes in the moisture content of the air. This causes it to expand and shrink in an attempt to reach a balance with its environment. If not properly installed or fastened, this can cause the wood to buckle and bow. Wood that has a tendency to warp includes cedar, redwood and composite lumber. Using wood with a straight grain pattern helps prevent warping.

Deck boards can also become warped due to improper care or cleaning. Using harsh chemicals on the boards can damage the surface and leave it vulnerable to rotting. Termites, carpenter ants and woodpeckers are also known to attack rotting wood and can damage it further. This damage can create a hole through which water can enter and cause further problems with the deck.

Having the proper tools can help you fix your warped deck boards. First, you must identify which portion of your deck needs to be repaired. Once you know this, you can obtain an accurate measurement of the decking to be replaced. Next, you can cut the decking with a circular saw, taking into account its depth. Be sure to wear protective equipment when working with a saw and follow any safety regulations.

Once you have removed the old decking, it is important to replace it with new board sections that are the same in length, colour and material. You should also ensure that the new decking is properly screwed down to the joists. Once the new decking is in place, it can be sealed to protect it from weather and sun damage.

It is possible to repair a single warped deck board, although it is not as cost effective as replacing the whole section of the decking. It is recommended that you contact a professional installer to assess the overall condition of your decking and recommend a solution.

Rust

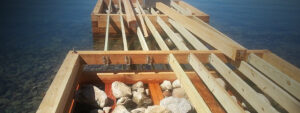
No matter how beautiful and sturdy your dock was when built, it will eventually need some attention. A floating dock’s constant contact with water makes it prone to damage from boats, waves, and wind. Even treated wood, if exposed to saltwater, will begin to degrade over time. If this happens, it’s important to call a local dock builder or waterfront company to take a look at the damage and determine whether repair or replacement is needed.

A common problem that a professional will notice is rust, either small spots or widespread corrosion on the steel or aluminum that is used for boat dock construction. While a little bit of rust might be easy to patch up, extensive corrosion can compromise the structural integrity of your dock and is therefore a warning sign that it’s time for replacement or major repairs.

Some rust spots can be repaired with simple body filler, but widespread rust will likely require a more in-depth treatment. A professional will typically use a more aggressive chemical solution to remove the existing rust and then spray on a coating of epoxy or other protective chemical. This coating will protect the metal from future damage and ensure that the rust doesn’t spread.

Loose boards on your dock deck might not be a big structural concern, but you don’t want to trip or fall over them either. Similarly, if you see any gaps between dock sections that make it difficult or impossible to walk from one side to the other, this might be an indication of a bigger problem, such as rotting or loose screws.

Another sign that it’s time for a dock repair is the sound of rattling, creaking or grinding noises. Often these are due to loose screws, rotting boards or a combination of the two. While these problems might not be a huge deal right now, they could cause bigger issues down the road, so it’s always best to be proactive and call in a local dock builder to assess the situation. They can also give you a quote for repairing or replacing your dock.

Wood Rot

Wood rot is caused by fungi that break down the parts of the wood that make it strong and stiff. This makes the wood soft and brittle and weakens it. It can destroy a house and the structures within it. If the rotting is severe it can also be a fire hazard.

If you suspect your home may be affected by rot, the best course of action is to have a professional survey carried out. This will identify the type of fungi and how serious the problem is. It will then recommend a course of treatment.

The first step is to eliminate the source of the dampness that’s enabling the fungi to thrive. This will require a complete survey of the property to ensure that all areas are dry and any defects are repaired. This could include a blocked gutter, damaged roof covering or an inadequate damp proof course (DPC). It’s essential that the surveyor identifies all sources of moisture to be sure the rot is stopped dead in its tracks.

Once the source of moisture has been eliminated, the timbers that have been affected can be treated. This will include removing any spores and hyphae, cutting back the infected timber to at least 500mm beyond the last signs of infection and sterilising all affected areas. This can be a daunting job for a homeowner, but is vital to ensuring the safety and security of the building.

In most cases, rot in wood is a result of poor maintenance rather than design flaws. Missing a painting cycle, failing to clean gutters or failing to caulk around windows and doors can allow water to seep in, waking up decay organisms that can turn wood into a mushy mess.

If the rot is limited to just one area of timber, it may be possible to repair it using a wood filler. However, if the damage is extensive and the fungus has already spread to other areas of the frame, the whole area will need replacing. If attempting to repair the rot yourself, it’s a good idea to start with a small section of timber and work your way up to more damaged areas as you gain confidence and experience. It’s also important to follow the materials instructions closely when applying filler and wood hardeners.

Cracks

It’s important to catch dock damage early before it becomes a bigger problem. Whether it’s a crack in the foundation or a section of the dock that sinks, you need to address these issues right away. This is especially true if the cracks are in load-bearing areas of the structure. These problems can lead to significant and expensive structural repairs. Depending on the severity of the damage, it may be best to hire a professional to ensure the safety of the dock and those using it.

Wood rot and rust are two common issues that can be found on most docks. Both of these can be repaired fairly easily if they’re caught in time. If the rotting has gone too far, however, then it’s best to get a new dock. This will prevent further rot, and it’s also much safer to use.

Another issue that can be fixed fairly easily is rusty hardware on the dock. The constant turbulence of the water and the harsh thuds of boats motoring into it can cause a lot of wear and tear on the equipment on your dock. This is a great opportunity to upgrade to better and more durable hardware.

A common problem that can be difficult to fix is a crack in the foundation of the dock. This can be extremely dangerous if it’s in the load-bearing sections of the dock. This type of crack can compromise the structural integrity of the entire dock, so it’s important to have it addressed immediately. A professional can help to determine if the crack is serious and needs to be replaced or if it’s something less severe that just requires a sealant. Depending on the extent of the repair, you may be able to do it yourself, but it’s always best to contact a professional if you’re unsure of what to do.

Stucco Removal Requires Proper Preparation and Safety Measures

Whether you want to renovate your home or are preparing for a sale, it’s important to consider the condition of the stucco walls. Stucco Philadelphia is a labor-intensive project and requires proper preparation and safety measures to complete successfully.

Testing your wall’s condition can save you money, time, and energy in the long run.

The stucco on your home’s exterior provides a durable, decorative, and protective barrier from the elements. It’s also a significant financial investment, so keeping it in good condition is important. It’s also a great place for mildew and mold to thrive, which can cause substantial and expensive damage to the structure. Washing the stucco regularly is one way to prevent these problems, and it’s easy to do without damaging the material. However, before cleaning, it is essential to inspect the wall surface for minor cracks or damage. If you miss them, they could worsen during the washing process and result in water seepage, leading to mold and mildew.

During the inspection process, you should also note the state of the underlying wall and take the necessary steps to repair any damage or areas needing improvement. This step is particularly important if you’re planning to wash your stucco, as it will help ensure that the material is in good condition for the wash process and will resist damage from the pressure washer.

You’ll need various tools and materials to prepare for the stucco removal. Start by covering surfaces you want to avoid getting dust or debris on with tarps or drop cloths. This will protect furniture, fixtures, and any other items in the work area from falling debris or splatters during the process.

Once the walls have been protected, break up the texture using a pneumatic chisel or hammer drill with a chisel blade. This can be challenging and time-consuming, so it’s important to take your time and be careful not to damage the underlying surface. Once the texture is broken up, you can scrape off any loose particles and smooth the surface using a grinder equipped with a diamond blade.

Once you’ve cleaned the wall and repaired any damaged areas, you can apply a new coat of texture to match the existing surface. This is an important step, as it will ensure that the new material is well-blended with the old and creates a uniform appearance. You can add a final coat of paint to the wall to complete the project if desired.

Depending on the scope of your stucco removal project, several tools will need to be available. Having these tools will help ensure that the job is completed quickly, efficiently, and correctly. Using the right tools also helps to ensure that your workers are not creating more problems by damaging the underlying materials as they remove the stucco.

First, workers must prepare the worksite by laying tarps and erecting scaffolding. They will then use a hammer to create a small hole in the stucco and a chisel or crowbar to loosen and break apart the stucco. Suppose they discover severely deteriorated brick underneath the stucco. In that case, they must reassess whether it makes sense to continue the removal or find a local mason to help repair and restore the underlying brick.

If it makes sense to continue removing, a circular saw will remove the stucco. They must be careful not to cut into the underlying wire mesh. Once the stucco is removed, they must use a pry bar and wire cutters to remove any remaining nails stuck in the brick.

Once the walls are free of stucco, they must be cleaned and prepped for patching and repairing. The surface must be scrubbed with a broom or brush to remove any dust or debris from the wall and then dampened with water for better adhesion. If there are cracks or holes in the wall, they must be filled in and then repaired with plaster before improving the surrounding stucco texture.

Stucco is a popular plaster for exterior walls due to its durability and long lifespan. It is also known for adding a unique, attractive style to homes and buildings. If you want to update your building’s look or want a new exterior, removing the stucco texture is an easy way. Following the steps outlined in this article, you can easily strip old stucco and give your building a fresh and updated appearance.

During stucco removal, it is important to follow proper safety measures to avoid injury. The first step is to wear protective equipment, including a mask and goggles, to protect your eyes and respiratory system from dust and debris. Similarly, it is recommended to use gloves and a face guard to protect your skin from the sharp edges of a chisel or scraper. Furthermore, clearing the work area of any furniture or fixtures that could be damaged is necessary. Lastly, proper disposal of leftover materials is important to avoid environmental harm.

If the wall or ceiling contains asbestos, testing this material before beginning the removal process is crucial. If your ceilings are covered in this material, you must hire a professional mason to remove and replace the material. It is also wise to cover any exposed brick with new drywall. If the underlying brick is severely deteriorated, replace it entirely rather than attempt to salvage it through plastering.

It is also recommended to place a tarp beneath the work site to catch falling debris and shorten clean-up time. Using a circular saw with a diamond blade to cut through the stucco is usually more effective than using a hammer and chisel. However, it is possible to achieve similar results by carefully chipping away at the existing texture with a chisel and a crowbar.

When the chiseling and scraping have been completed, washing the walls with a hose sprayer or cleaning solution is recommended. Then, allow the walls to dry thoroughly before repairing any cracks or holes. If your stucco is a lighter color, washing it before applying any paint or cladding is generally best.

Inspecting stucco walls regularly for signs of deterioration or water damage is advisable, as these can lead to more serious problems. For example, if you notice a patch of green algae growing on your stucco, it is a good idea to use a safe cleaning product for outdoor use. This way, you can easily remove the stains without damaging your stucco.

In some cases, black stains appear on the stucco of homes. These can be caused by mildew and algae grown in the porous stucco. The fungi are attracted to damp conditions and organic material like dirt and plant matter. Eventually, they can cause damage to the stucco surface and may also contribute to cracks in the wall. To get rid of these stains, you must first kill the mildew and algae before scrubbing away the residue.

If you are using a pressure washer to clean the walls, be sure that it is set to low pressure and that you are standing a safe distance from the wall. Using a high-pressure setting can damage the stucco surface and lead to cracks in the wall.

Begin by pre-wetting the stained area of your stucco home with water to draw the stains to the surface. Then, saturate the section with a cleaning solution. Let the solution sit for five to ten minutes. You should spray the section lightly with water once or twice during this time. This will help to keep the cleaner activated and prevent it from drying too quickly.

After the cleaning solution has had a few minutes to soak in, begin scrubbing the area with your brush and water. Be sure to clean the areas where the stains are most prominent. Rinse the stucco surface again when you are finished scrubbing. Use a lower pressure setting this time, and position the nozzle about 24 inches away from the stucco surface.

Once you have rinsed the surface, it’s important to inspect the walls and look for any cracks or damage that might have occurred during the scrubbing process. Please fill in any cracks that appear before they widen too much, and call a professional for advice if you see anything that looks like it needs some attention.

Stucco is less resilient than vinyl or wood siding, and continuously exposing it to the elements can lead to cracks and rot over time. In addition, if you wash your stucco without carefully inspecting it before and after, you could be blasting dirt and other debris into the house’s interior through any open cracks or crevices in the wall.

When Do You Need a Home Excavation Contractor?

One of the first steps in constructing a home is digging the foundation. A professional excavation contractor can provide cost estimates for the work and help homeowners save money in this step of construction.

During the excavation process, buried pipes and utility lines may be found. Calling in a surveyor before starting the project can prevent hitting and damaging these lines. Click https://www.levelgroundexcavation.com/ to learn more.

excavation

Site preparation is a necessary step in any construction project. It involves clearing the land and preparing it for the foundation of your new home. It can also include drainage, sewer, water line installation, and land grading. This process is critical to building a house on solid ground and preventing problems down the road.

Regarding excavation site work, it’s best to choose an experienced contractor. This will ensure that the work is completed correctly and safely. It can also help reduce costs and time for the project. In addition, an experienced excavation contractor will be able to determine the right size equipment for the job.

The first step in site preparation is removing all debris, rocks, trees, and other objects. This will give the excavation crew a clear space in which to work. This is also when soil testing is done on the property. This will allow the excavation team to see if any issues could affect the construction of your new home.

Once the site is cleared, the excavation crew will begin digging the foundation trenches. Each site plan has specifications for these trenches, so the excavation contractor must follow them closely. Once the trenches are dug, backfilling and topsoil placement will be done. This will help to prevent mudslides, erosion, and other problems down the road.

Another key part of site preparation is laying a gravel base. This will protect the soil from moisture and help prevent the mudslides and erosion that can occur when it rains. This base will also help to prevent moisture from seeping into the basement of your new home.

After the trenches and gravel base are installed, the excavation team will install the utility lines for your new home. This will include the sewer, water, electricity, and cable lines. Once the utilities are installed, the excavation team will perform land grading to shape your building pad again and divert surface water away from the foundation. This is a very important part of the process that can’t be skipped or rushed.

It’s important to get the footing right when building a home. The footing transfers the weight of the structure to the soil underneath it. The ideal soil for the footing is firm, non-expansive clay or gravel with a high bearing capacity.

A home excavation professional will ensure the soil can support the foundation before digging into it. They’ll also ensure that the drainage system can prevent water from pooling around the foundation, which can cause it to shift over time.

Surveying the site is another important part of a home excavation project. This process transforms construction plans from paper into a physical representation on the ground level, letting excavators know exactly where the foundation should be. It also helps them identify potential hazards, such as underground utility lines.

Before the excavation begins, clearing the area of all trees, bushes, rocks, and structures is crucial. This will protect the crew from injury and ensure they can work safely. It’s also necessary to mark the boundaries of the excavation site with white waterproof marking paint. This will help avoid misunderstandings during construction and protect you from any property damage.

Once the site is cleared, it’s time to begin excavating. This is a large job that requires extensive machinery and expertise. It’s also a very dangerous job, so hiring an experienced excavation contractor is important. They’ll have the proper equipment and skills to complete the excavation quickly and efficiently.

Home excavation projects are complex and time-consuming, but they’re necessary for building your new home or other structures. The right excavation contractor will be able to get the job done quickly and correctly so you can start construction on schedule. If you’re considering a home excavation, contact a reputable contractor for a quote today. They can provide the needed services, including soil testing, dirt removal, and site grading. They’ll also take care of any zoning requirements for your area and obtain all the necessary permits. They can even handle site grading, a big part of preparing the land for the foundation and other construction components.

The septic system is an important part of any home construction project. This is because it will help to ensure that sewage waste is properly disposed of and does not enter the water supply or cause environmental damage. The first step in installing a septic system is excavation. This involves digging a hole in the ground for the tank, connecting it to the sewer line, and filling it with concrete and other materials. It is important to hire professionals to perform this task to ensure that it is done correctly and to prevent any future issues with the septic system.

The cost of residential excavation can vary depending on the type of project and location of the job site. If the property is located far from a major highway, it will be more expensive to transport heavy machinery to the site. It is also important to consider whether the property has any underground utilities, such as phone, gas, or electric lines, which may need to be relocated during excavation. These costs can add up quickly, so it is also important to budget for them.

Before the excavation begins, it is important to check with local utility companies to find where the underground lines are. This is because if these lines are damaged during the excavation process, it can result in costly repairs and service interruptions later on. Then, the site must be surveyed and marked to determine how much soil needs to be removed and where it should be placed. This process is called trench mapping and should be performed by a qualified professional.

Once the site has been mapped, the contractor can begin the dig. This is done using large tractors and other heavy machinery. It is important to schedule this work at a time when it will not interfere with the rest of the construction process. It is also important to hire a reputable excavation company that understands the laws and safety protocols regarding excavating.

Once the septic system has been installed, taking care of it for a long time is important. This means not flushing things like tampons, disposable wipes, cotton balls, and other materials that can clog the system. It is also important to pump the septic tank every three to five years.

While building a home may sound overwhelming, proper excavation site work can make the construction process go much more smoothly. A well-prepared site will allow the foundations of a home to be built on solid ground and ensure that any drainage or sewage systems work properly. Having a poorly prepared site can lead to structural problems and damage, so it is important to hire an experienced excavation contractor.

Excavation is a complex and time-consuming task that requires professional equipment and training. As a result, most homeowners choose to have professionals take care of excavation for their homes. In addition, digging is a hazardous task that can be dangerous to anyone who isn’t trained and equipped with the right tools. However, DIYers can take on small excavation projects independently with the proper equipment and safety precautions.

To avoid causing harm to any pipes or cables underneath the surface, it is essential for homeowners to call their local utility company and have a survey done before digging. This will provide a map of what is underground and where it is located so that it can be avoided during excavation. It is also a good idea for homeowners to ask their excavation contractors to flag buried pipes and wires before starting the project, as this will help to prevent any mishaps or injuries during the dig.

When it comes to excavation site work, a few things can affect the overall price of the job. For instance, the more rock and dirt that needs to be removed from a site, the higher the costs will be. The excavation contractor must rent more equipment and work longer to clear a large land area.

In addition, the cost of a residential excavation can be affected by how deep it needs to be dug. For example, if a house needs to be built in a basement, the excavation will need to be dug deeper than a standard house that doesn’t have a basement. This is because a basement’s foundation needs to be placed on cement footers, which will need to be at least 30″ below the surface.