Flooring Refinishing – How to Refinish Your Floors Yourself

You can resurface your floors with a traditional varnish or a polyurethane finish. Be sure to use a low-VOC product. For more information, just click the Flooring Middletown NY to proceed or inquire.

Sanding your hardwood floors using medium-grit sandpaper is also a good idea. This will remove dents and nicks in the wood and help the stain or varnish adhere properly.

Hardwood floor refinishing is a complicated job and one that should only be done by a qualified contractor. It requires great skill and knowledge, and using the wrong equipment can result in disastrous results. If you are considering refinishing your hardwood flooring, research the process thoroughly and gather as much information as possible on how to do it properly. A good place to start is by reading some online articles and talking to other people who have completed refinishing projects themselves.

Once you have a clear idea of the process, you can decide whether to hire a professional or try it yourself. Both options are viable, depending on your comfort level and skills. If you are going to attempt a DIY project, make sure to gather the appropriate tools and equipment beforehand. Also, remove all furniture from the area being worked on, as this will prevent damage and keep the work site organized. Also, ensure you have chosen the right stain and varnish for your floor. It’s important to use a quality product that is oil-based, low VOC, and a high-quality brush.

If you are working with natural wood, it’s important to know the color variations that naturally occur between individual boards. These variances will be more apparent after refinishing, and ensuring that the final result matches your expectations is vital. This is why it’s important to take the time to choose the correct stain and test it out on a small sample of your floor before you commit to it.

Another consideration when choosing a stain is whether you prefer a varnish or a wax finish. A varnish is a harder, more durable coating than a wax. It also leaves no color on your floor, while a wax finish does have a subtle hue that can alter the overall appearance of your floors.

Once you’ve sanded your wood floors, allowing them to dry completely before you move the furniture back in is important. Then, apply a couple of coats of your new finish. Typically, this will be either an oil-based or water-based polyurethane, depending on your preference.

Concrete is a common material used in commercial construction and refinishing. It can provide a fresh look for your floors. It consists of aggregate bonded together with a fluid cement. It hardens over time, becoming very durable and strong. It can be polished to a high sheen, stained, or coated with a protective coating. Concrete resurfacing is a quick and inexpensive alternative to removing and replacing damaged flooring materials.

The first step in refinishing concrete is to etch, grind, shoot, and blast the surface to make it porous and then repair any cracks. Clean and priming the floor before applying any new surface is important. Removing any protruding metal pieces is essential as these can cause a hazard. After the surface has been etched and cleaned, it must be sanded with fine-grit sandpaper to smooth it. Using a hand-held power sander for tight spaces and corners is best.

After the sanding process, you can stain your concrete floors. Stains are absorbed into the concrete surface and are more durable than paints, which sit on top of the floor. Stains are available in a wide range of colors and can be custom-mixed for specific projects.

Another option for concrete refinishing is to cover the surface with an epoxy coating. Epoxy coatings are fast-drying and can be installed in a variety of patterns. They can also be tinted in various colors to match your décor.

Consider adding stencils and decorative saw cuts to your floor refinishing project if you want a decorative touch. They will give your refinished floor a unique and sophisticated appearance to impress your customers and clients.

Whether using concrete stain or an epoxy coating, it is important to protect the floor with a sealant. This will protect the floor from dirt, chemicals, and other stains. It will also help with maintenance, making the surface easier to sweep and mop. It’s a good idea to ask your flooring contractor what sealant they recommend for your floor.

Refinishing or resurfacing tile is an affordable way to breathe new life into dated tile floors. This process isn’t just for tile flooring; it can also be used to refresh grout, showers, and even walls.

Before refinishing the tile, it’s important to perform a thorough cleaning. This will remove any dirt, grime, soap scum, or stains that have built up over time. It’s recommended to use a non-acidic cleaner that is safe for your tile type. Once the tiles are clean, it’s a good idea to repair any loose or cracked pieces and allow them to dry completely.

Once the tiles are dry, you must apply a resurfacing product. Several options are available on the market, including a powder that you can mix with water to form a paste or a liquid that can be applied with a brush. It’s best to follow the instructions provided by the manufacturer of your resurfacing product.

When refinishing tile, you’ll want to put down plastic sheeting over the doorways to prevent dust from entering the rest of your home. It’s also good to tape off floor registers and pull up any shoe molding along the wall-floor joint. This will protect the baseboard and make it easier to reinstall once you finish the refinishing job.

If you’re refinishing tile floors, choosing a stain color that will coordinate well with your decor is a good idea. Remember that the stain will be darker than the original color of the floor since refinishing removes some of the wood grain. If you’re unsure what color to choose, ask your flooring professional for advice.

After the resurfacing coating has dried completely, applying a protective sealant to the floor is a good idea. This will help to protect it against moisture, stains, and regular wear and tear, extending the lifespan of your refinishing job. This step is especially important if you live in an area with much rain.

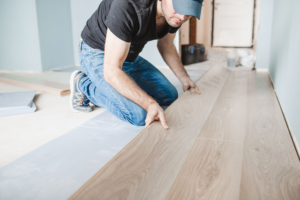
Laminate is a popular flooring option for its cost-effectiveness and resilience. However, like all floors, it can suffer from normal wear and tear over time. Fortunately, laminate can be restored through flooring refinishing to restore its elegance. Refinishing wood laminate floors can be done using various methods, which we will explore in this article. However, it should be noted that refinishing laminate is more challenging than refinishing hardwood floors. It requires a certain level of patience and care to get the best results.

Laminate comes in many different designs and styles. It is manufactured in layers, with each layer adding to the durability of the final product. The first layer is the wear layer, a durable coating that protects against scratches, water, and stains. Next is the decorative paper layer, which can be printed to look like real wood or other natural materials. Finally, the core layer combines melamine resin and fiberboard materials that help make the final laminate product sturdy and durable.

During manufacturing, each laminate plank is milled with micron-precise tolerances and cut to specific profile edges. The edges are also glued together with a special adhesive. These features allow the planks to fit together easily and consistently according to one of four locking systems panel profiles. The planks are then sealed with a special protective finish to resist stains, scratches, and other damage.

If a laminate floor has minor scratches, the wear layer can be sanded to remove the scratch and refinish the plank. However, replacing the plank rather than sand and refinishing is better if the laminate has been badly scratched or damaged.

Refinishing a laminate floor with a polyurethane sealant will help to keep the new coat of stain from chipping or peeling. A good quality polyurethane will also guard against the fading of the color caused by prolonged exposure to sunlight.

While it is important to refinish laminate floors, it is also good practice to prevent the need for refinishing by sweeping and mopping regularly and keeping furniture protectors on your chairs and tables to avoid scratches. It would be best if you also considered putting doormats in entryways to catch dirt before it has the opportunity to get into your home.

Log Cabin Builders

Log Cabin Builders Oregon is an expert in designing and bringing their clients’ dream log homes. Whether planning a full-scale custom home or just a small log cabin, these professionals will ensure the build meets your specifications.

Today’s modern log homes are typically pinned or spiked together rather than hewn in the field like ancient buildings. This method allows for a quicker build time and a more durable structure.

log cabin builders

The experience of log cabin builders is important when building a log home or timber frame house. Their knowledge and expertise in this area will ensure that your home is finished to the highest standard. This will help to avoid problems with the construction process, which can result in costly delays.

Historically, log cabins were built by stacking logs together to form walls. They were then notched and pegged to lock them in place. The notching method was designed to reduce the need for mortar and also to prevent rotting and insect infestations. Today, many log cabins are pinned or spiked together. This method can be very time-consuming, but it is also very sturdy and durable.

Log homes require special attention to plumbing, heating and electrical systems. These can be very expensive to install and may need to be reworked later. It is important to discuss these issues with your contractor early in the process to ensure that they are aware of your requirements and can deliver a solution that fits your needs.

One of the most important elements in a log home is its foundation. It is essential that the proper footings are in place before the first course of logs is erected. Proper foundations are crucial for the structural integrity of the home and will also help to maintain a comfortable indoor temperature throughout the year.

Once the sill logs are in place and fixed with rebar, you can start laying the first course of logs. This should be done using the butt and pass notch technique, and it is a good idea to use rebar pins at this stage. Once the first course is complete, you can begin to chink the logs. Chinking is a type of infill that is used between logs in log-walled structures. Traditionally, dried mosses (Pleurozium schreberi and Hylocomium splendens) were used as an insulator between logs.

Once the exterior of your log cabin is complete, it’s time to begin putting in the doors and windows. Ideally, these should be installed before the roof goes on to ensure that the log shell is watertight. However, if this is not possible, you can save some time and money by installing the door and window frames while the logs are still being erected.

Log cabins have long been associated with rustic frontier living. However, today’stoday’s log homes are often a lot more sophisticated than their historic counterparts. Modern log homes require extensive joinery and aesthetic design. They also have to meet rigorous building codes and energy requirements. These requirements mean that they can be expensive to build.

Before you start building, it it’s a good idea to do some research. Find out what building codes and other restrictions apply to your location, and speak with a professional to make sure that your log cabin will be in compliance. You should also be familiar with the local zoning laws. This will help you avoid costly surprises down the road.

The first step in a log home is laying the foundation. Traditionally this was done with sill logs – a method that required little skill or craftsmanship. This technique is still used for the foundations of some log cabins, but more often these days a “”butt and pass”” notch is preferred. This requires less scribing than the traditional saddle notch, and allows the builders to use short rebar fixings. Once the foundation is laid, the rest of the logs can be fitted to it.

Once the foundation is set, it’s time to start erecting the walls of your cabin. The process is very similar to conventional construction – you stack whole logs, using the butt and pass or saddle notch (whichever you have chosen), and a system of rebar to hold them in place. Usually the rebar will be used for both lateral and vertical restraint, but in larger logs it may be necessary to use struts for lateral restraint.

When erecting the walls, it’s important to leave space at the top of openings such as doors and windows. This will allow for the natural shrinkage of the logs and prevent the walls from binding against the window or door frames. For this reason, it it’s also a good idea to use an adjustable jack on the roof.

When it comes to the inside of a log cabin, lighting is critical. Logs absorb light rather than reflecting it like drywall, so it’sit’s important to include more fixtures than you would in a conventional house. A well-lit interior will make a log cabin feel spacious and inviting.

When building a log cabin, you must plan your budget carefully. It can be expensive to hire a builder or attempt to do it yourself, and mistakes can cost you dearly in terms of time and money. In addition to the cost of materials, you need to consider other costs, including site prep and utility installation. For instance, a new cabin in a rural location may need to be connected to the water or sewer system, which can cost up to $10,000 on average. You should also budget for electrical and HVAC systems.

The price per square foot of a log home can vary significantly, depending on the location and terrain of your property. For example, a hilly or mountainous area can require land clearing, which can be more costly than a flat site. A topographic land survey can help you estimate these costs. Additionally, a log cabin in a rural or remote location will be farther away from city utilities, which can increase the cost of energy and water supplies.

A good way to keep your log cabin project within budget is to opt for a kit instead of a custom-built home. This option saves you a lot of time, effort, and money by eliminating construction delays and other costly complications. In addition, kits are designed with efficiency in mind, saving you money on materials and labor. Furthermore, they feature logs that are cut to a specific length, which eliminates waste and improves the durability of your home.

Another way to cut your budget is by choosing a smaller floor plan and going for height over width. This can reduce foundation costs and make your log cabin more energy-efficient. You can also choose energy-efficient systems like solar panels, which are more expensive upfront but can save you money over the long term.

Another thing to consider is the amount of maintenance required for a log cabin. A quality log cabin should be re-stained every three years to keep it looking its best. In addition, you should wash your log cabin annually to remove dirt and grime.

Before hiring log cabin builders, it’s important to decide where you want your dream home to be located. This will affect the type of wood you choose, as well as the overall cost of the build. Ideally, you should select a site that is close to your family and friends. The location of your log cabin should also provide easy access to local amenities and natural attractions. In addition, it’s important to find a location with a backdrop that complements the style of your cabin.

When choosing a company to build your log cabin, you should look for one that has experience and is familiar with the building process. Having an experienced log cabin builder by your side will help you avoid the potential for costly mistakes that could cost you time and money. A good way to determine the level of expertise of a log home builder is to review online reviews and customer feedback.

There are a number of different types of log cabins available, each with its own unique set of benefits and drawbacks. One of the most common is the full-scribe method, which uses full logs that are milled or cut to sit tightly against each other with little to no gaps. This method is usually seen in homes that are primarily used as vacation rentals or summer cottages. This type of log cabin is typically more expensive than a traditional framed home, but it is extremely durable and requires very little maintenance.

Another option for log cabin building is the chink method, which involves using less costly and lightweight materials to fill in the gaps between the logs. This method has some advantages over the full-scribe technique, but it does not offer as much structural stability and longevity. It is also less energy efficient than the full-scribe technique, and it requires the use of expansion and contraction sleeves to accommodate the movement of logs as they settle and shrink.

If you’reyou’re looking for a more modern and affordable option, you might consider the log-sided chalet style of log cabin. This is a more versatile building technique that can be used for both residential and commercial purposes. Unlike the more traditional, squared-off log cabins, log-sided chalets feature flat roofs and do not require a vaulted ceiling. The log-sided chalet can also be converted into a traditional framed house, if desired.